File Level Restore from Windows Agent
Follow this KB article to restore one or more folders and files from an eSilo Veeam backup. These steps can be performed from any Windows machine with the Veeam Agent for Windows (VAW) installed.
Steps to Follow
- Launch the Veeam File Level Restore (FLR) wizard.
- Access the wizard by double-clicking on the Veeam icon in the taskbar, or from Programs >> Veeam >> File Level Restore.
- If you need to restore the files on a machine that does not have the Veeam Agent for Windows installed you may download the agent package here which includes the FLR module.
- If restoring from an eSilo cloud backup, select Network Storage. Click Next.
- For an eSilo cloud backup, select Veeam Cloud Connect Repository. Click Next.
- Specify remote storage settings to connect to eSilo Cloud Connect (see your Welcome Email for details).

- Specify remote storage settings to connect to eSilo Cloud Connect (see your Welcome Email for details).
- Specify user credentials
- If logging in as the Company Owner, the username should be: [CompanyOwner]. All backups under the Company account will be visible to the Company owner.
- If logging in as a Subtenant User, the username should be: [Company\SubtenantUser]. Only backups created by this Subtenant User will be visible.
- Password: [Password on file] – Contact eSilo if you need this password reset.
- Select a backup
- If you restore data from an encrypted backup that was created on another Veeam Agent computer, you need to provide a password to unlock the encrypted file. See how to restore from an encrypted backup for more details.
- Select a restore point.
- Click Next.
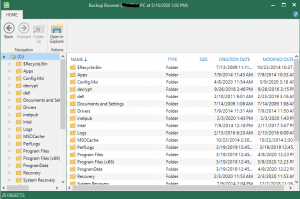
- Click Open. Veeam Agent for Microsoft Windows will then retrieve the contents of the backup file, publish it directly into the file system of your computer and display it in the Veeam Backup Browser. Because this step requires reading of the full backup file, this step can take up to 5-10 minutes to populate.
- Browse to the file(s) to restore and choose where you want to restore them to. Hold down SHIFT to select multiple files:
- Save files and folders to their initial location – Right-click and select Restore. To overwrite the original item on your computer with the item restored from the backup, select Restore > Overwrite. To save the item restored from the backup next to the original item on your computer, select Restore > Keep. Veeam Agent for Microsoft Windows will add the “RESTORED-” prefix to the restored file or folder name and save it in the same location where the original file resides.
- Save files and folders to a new location – Right-click and select Copy To.
- In the dialogue box, you may need to uncheck “Preserve permissions and ownership” if you are restoring on behalf of another user.
- Veeam will automatically suggest saving the files to a new directory called “restored files” under the current Windows user. You may change this setting.
- Alternatively, you can open and browse the backup files in Microsoft Windows Explorer – It is recommended, however, to do all file-level restores directly from the Veeam File Level Restore wizard as it provides more options for visibility and permission management.


Additional Veeam KB Articles:


