Follow these instructions to install & configure the Veeam Management Agent on a new machine, which enables two-way communication with eSilo’s cloud.
Overview:
- Difficulty Level: Easy
- Total Setup Time: 3-5 Minutes
Steps to Follow:
- Download the Veeam Management Agent from one of the below sources:
- Open the eSilo Portal Welcome Email and click on the Management Agent link. This directs to: https://portal.esilo.com/Agent/DownloadAgent (EASIEST)
- Alternatively, you may login to the eSilo Backup Portal directly at https://portal.esilo.com with your tenant credentials (from the Welcome Email) and go to Discovery >> Discovered Computers >> Download Agent.
- Once downloaded, double click the file, ManagementAgent.exe, to Run it.
- Accept the license terms
- Click Next to install in the default directories. Click Finish.
- Launch the Management Agent from your Start menu Program List or by searching “Veeam Management Agent”
- You will notice the below icon in your Windows Taskbar when the Management Agent is running.
- Double click on the icon circled above to open the Management Agent.
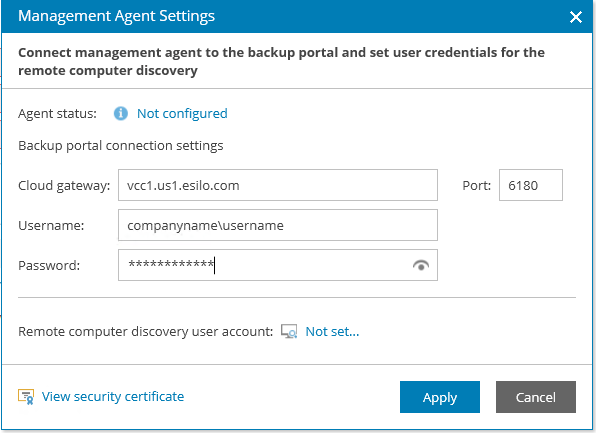
- Specify the Cloud Gateway location and credentials from your Welcome Email.
- Cloud Gatway: vcc1.us1.esilo.com
- Port: 6180
- Username: [from email]
- Password: [from email]

- After inputting all fields, click Apply.
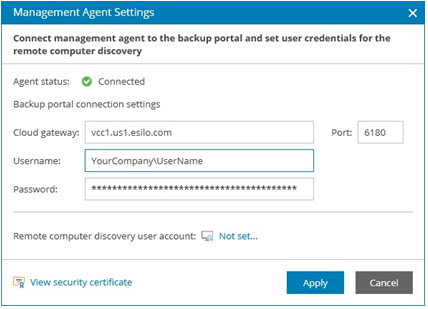
- You will be asked to restart the Management Agent (this does not restart Windows). Click OK.
- The screen will reload and if the connection is successful, you will see “Agent Status: Connected“. If you see any other status, double-check your input fields and reapply the settings. If you are still unable to connect successfully, contact eSilo Support for assistance.
- Installation is now complete. You may close the Management Agent.